As we have moved ahead in using new technologies, DataStage as a product also caught up introducing latest XML Stage in v8.5 on-wards along with some other cool stages.
Today, I will share my experience and lesson learnt around how to use XML parser and switch step in order to flatten complex XML file.
Note: In this blog I'm not going to talk about XML Input, XML Output or XML Transformation step. We will focus on XML stage only.
Sample XML input File
<?xml version="1.0" encoding="UTF-8"?>
<Employee>
<Record>
<EmpNo>1</EmpNo>
<EmpName>Suhel</EmpName>
<EmpPhone>
<Type>Home</Type>
<Value>123-123-1234</Value>
</EmpPhone>
<EmpPhone>
<Type>Cell</Type>
<Value>123-222-1234</Value>
</EmpPhone>
<EmpPhone>
<Type>Work</Type>
<Value>123-333-1234</Value>
</EmpPhone>
<EmpDesignation>Consultant</EmpDesignation>
</Record>
<Record>
<EmpNo>2</EmpNo>
<EmpName>Dexter</EmpName>
<EmpPhone>
<Type>Home</Type>
<Value>456-123-1234</Value>
</EmpPhone>
<EmpPhone>
<Type>Work</Type>
<Value>456-222-1234</Value>
</EmpPhone>
<EmpDesignation>Consultant</EmpDesignation>
</Record>
</Employee>
Expected Output:
For example, if we need pipe delimited flat file
EmpNo|EmpName|EmpPhoneWork|EmpDesignation
1|Suhel|123-333-1234|Consultant
2|Dexter|456-222-1234|Consultant
In order to use the XML stage, we need to have XSD (XML Schema definition) File. We should get the XSD from the corresponding source system.
You may generate XSD in case you don't get one from source system but this is risky option because XML you use may not have all the tags required to be there in XSD.
Please follow below steps in order to parse the XML
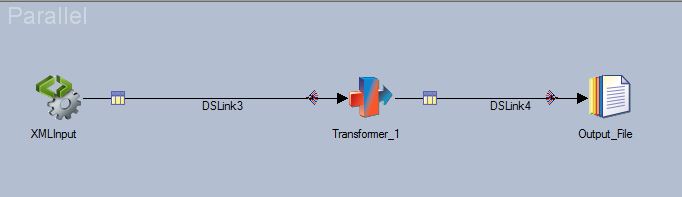
1) Select the parallel job. Pull all the required stages on canvas and align them as below.
 2) Open the XML Stage and click on "Edit Assembly" button. Then Click on "Library" tab Here you need to import the XSD.
Click on New library and give the library Name as "Emp" as below.

3) Now Click on "Import New resource" button and select XSD from local box.


4) Now go back to "Assembly Editor" tab and Pull the required steps in order to parse the XML as below.

5) Next open the XML_Parser_Step and locate the XML file as below.

6) Click on "Document Root" which is now showing red exclamation sign (!) and trying to draw our attention. Click on it and select the correct Root document as below.

7) Now the tricky part comes - to parse through different chunks of EmpPhone and find the Work Phone number. To do that we have to use Switch step as below.
After that click on
"Add target" Button and Create a new constraint called
"FilterWorkPhone" and select the element/field you would like to
compare. Here in our example we want to read the value tag wherever the
"Type" is "work" (kept the case in-sensitive search) in
<EmpPhone> Chunk/Repetitive element.

9) Now on the right hand side you would get two panes Input and Output. Click on output and Locate the switch step element. This should have been added once you're done with all the steps above.
Select the constraint and click on "List to group" button.


11) After that click on Mappings and select the right element and map it to right field of file as below.
You may click on "Map Automatically" button and it would map all columns automatically with right tags. If you map something manually then you would get a lock symbol in front of that element.
 12) Once you do this - You're done with the XML stage. Now goto Output sequential file and configure with right filename and formats as desired. You should get the output as below.

Please leave the comments if you find this document useful OR there's a better way to achieve the desired output.
Thanks for reading.
XML Stage provides
ability to parse, compose, validate, sort, switch, pivot, join etc. using xml
files.
 |
| Available steps in XML Stage |
Today, I will share my experience and lesson learnt around how to use XML parser and switch step in order to flatten complex XML file.
Note: In this blog I'm not going to talk about XML Input, XML Output or XML Transformation step. We will focus on XML stage only.
Sample XML input File
<?xml version="1.0" encoding="UTF-8"?>
<Employee>
<Record>
<EmpNo>1</EmpNo>
<EmpName>Suhel</EmpName>
<EmpPhone>
<Type>Home</Type>
<Value>123-123-1234</Value>
</EmpPhone>
<EmpPhone>
<Type>Cell</Type>
<Value>123-222-1234</Value>
</EmpPhone>
<EmpPhone>
<Type>Work</Type>
<Value>123-333-1234</Value>
</EmpPhone>
<EmpDesignation>Consultant</EmpDesignation>
</Record>
<Record>
<EmpNo>2</EmpNo>
<EmpName>Dexter</EmpName>
<EmpPhone>
<Type>Home</Type>
<Value>456-123-1234</Value>
</EmpPhone>
<EmpPhone>
<Type>Work</Type>
<Value>456-222-1234</Value>
</EmpPhone>
<EmpDesignation>Consultant</EmpDesignation>
</Record>
</Employee>
Expected Output:
For example, if we need pipe delimited flat file
EmpNo|EmpName|EmpPhoneWork|EmpDesignation
1|Suhel|123-333-1234|Consultant
2|Dexter|456-222-1234|Consultant
In order to use the XML stage, we need to have XSD (XML Schema definition) File. We should get the XSD from the corresponding source system.
You may generate XSD in case you don't get one from source system but this is risky option because XML you use may not have all the tags required to be there in XSD.
Please follow below steps in order to parse the XML
1) Select the parallel job. Pull all the required stages on canvas and align them as below.
Click on New library and give the library Name as "Emp" as below.
In-case of schema validation errors you would get some error msgs in Red text as below. You may need to ask for correct XSD or if you know XSD language try to correct it.
4) Now go back to "Assembly Editor" tab and Pull the required steps in order to parse the XML as below.
5) Next open the XML_Parser_Step and locate the XML file as below.
You may use parameters
using insert parameters button.
6) Click on "Document Root" which is now showing red exclamation sign (!) and trying to draw our attention. Click on it and select the correct Root document as below.
7) Now the tricky part comes - to parse through different chunks of EmpPhone and find the Work Phone number. To do that we have to use Switch step as below.
First of all you need to
select the scope and then “List of Categorize” to correct elements as below.
9) Now on the right hand side you would get two panes Input and Output. Click on output and Locate the switch step element. This should have been added once you're done with all the steps above.
Select the constraint and click on "List to group" button.
Soon after doing this you should be able to see a small icon right beside the constraint name as below.
10) Now go-to final Output Step and fill out the target column names you would like to see in the flat file as below. I kept the data type as VarChar for all the columns, you may change it depending on the requirement.
11) After that click on Mappings and select the right element and map it to right field of file as below.
You may click on "Map Automatically" button and it would map all columns automatically with right tags. If you map something manually then you would get a lock symbol in front of that element.
Please leave the comments if you find this document useful OR there's a better way to achieve the desired output.
Thanks for reading.